
Pigeon Pose is a yoga asana (posture or position) that helps open the hips and relieve lower back pain. While it can be a great way to increase flexibility and stretch your muscles, it's important to perform the move correctly to avoid injury or strain.
Eka Pada Kapotasana is probably one of the most difficult and satisfying yoga poses. The full version includes an overhead grip that requires a deep backbend and considerable mobility in the shoulders and chest.
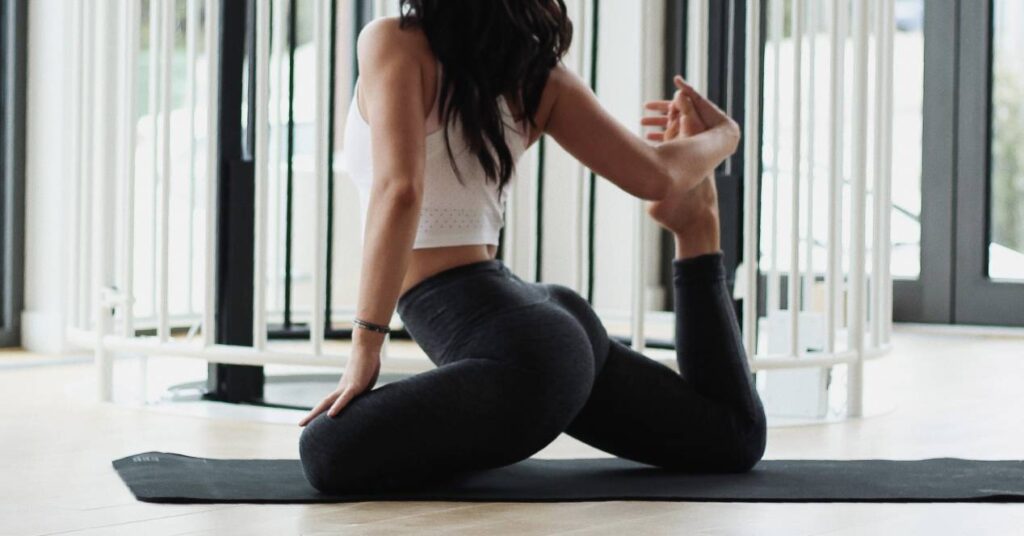
Technique to do the pigeon pose
This can be an intense stretch on the outer hip. To start, keep your right foot close to your left hip. The more parallel the shin is with the front of the mat, the more intense the hip opening will be. If your forehead does not reach the mat, you can make fists with your hands and stack them together and then rest your forehead on your hands, or use a yoga block.
You can also stand taller, supporting yourself on your elbows or hands, just remember not to slump your shoulders. Below, he discovers how to do the proper technique:
- While on all fours, bring your right knee toward your right wrist. Depending on your ability, you can stay just behind the doll or on the outside or inside edge of the doll. Do what feels good to you, giving a stretch to the outside of the hip without any discomfort to the knee.
- Your right ankle will be in front of your left hip.
- Slide your left leg back and through your heel, pointing toward the ceiling.
- Scissor your hips together, drawing your legs together. Use some support under your right buttock if necessary to keep your hips level.
- As you inhale, move closer to your fingertips, lengthen your spine, pull your navel in, and open your chest.
- As you exhale, walk your hands forward and lower your upper body toward the floor. You can rest your forearms and forehead on the mat.
- Stay for 5 breaths. On each exhalation, try to release the tension in the right hip.
Variations of Eka Pada Kapotasana
Pigeon Pose (known as Kapotasana) has many variations, although the most common are Classic Pigeon Pose, Resting Pigeon Pose, and King Pigeon Pose. Each variation has different stretches and degrees of difficulty. Since the pose requires some flexibility, you should do a light warm-up before practicing it.
After a warm-up, it is advisable to start with the classic pigeon pose, followed by the resting pigeon pose, and finally the king pigeon pose. This sequence will gradually prepare your body for more difficult variations in order to avoid injury.
Classic and resting pigeon pose
- On a yoga mat, start in downward-facing dog. To do this, get on all fours and place your hands in front of you. He presses his hands and feet, straightens his legs, and lifts his hips toward the ceiling. Your body will be in an inverted V position.
- Now lift your right leg off the ground and bring your right knee to the back of your right wrist. Then, rotate your right shin so that it is parallel to the front of your mat.
- As you bring your right leg to the mat, keep your left leg straight until it reaches the ground.
- Bring your right knee out so it's more to the right than your hips and make sure your right foot is dorsiflexed. Gently lower your right buttocks toward the floor, but make sure to keep your weight evenly distributed between both hips. If this is too difficult, place a folded towel under your right buttocks.
- Place both hands under your shoulders and gently press into your palms to straighten and lengthen your spine. She looks ahead and feels the stretch.
- Next, take a deep breath, and as you exhale, lower your torso onto your right leg and stretch your arms straight out in front of you, elbows slightly bent. Place your forehead on a yoga block or on your forearms crossed in front. If this is uncomfortable for you, reach forward as far as you can while comfortable.
- Gently move your shoulders away from your ears in a relaxed position.
- Hold this position for 5 to 10 slow, deep breaths.
- Repeat in the other side.
King Pigeon Pose
For most beginners, this move will be very difficult and may increase the risk of injury. Only try this pose as you gain flexibility and can easily perform Classic Pose and Resting Pigeon Pose with ease.
- Follow the first five steps of the previous pose to get into the classic pigeon pose.
- With your right leg bent and your left leg straight, bend your left knee to bring your left foot toward your back.
- Be sure to keep your toe plantar flexed.
- Then raise your left arm up toward the ceiling, slowly bend your elbow back, and grab your left foot.
- You can slightly lift your chin and look up, but avoid bending your neck back.
- Hold this position for 5 to 10 slow, deep breaths.
- Repeat with the other side.
Benefits of this yoga posture
This position focuses on open hips, which supports mobility and flexibility in that joint. Pigeon Pose also stretches the hip flexors and lower back, which are often tight from prolonged sitting. Stretching these muscles regularly can relieve minor back or hip pain.
When we practice Pigeon Pose with our upper body upright, we keep our spine flexible and reduce stress in the front of our torso. It's a great pose that works the entire spine, from the pelvis to the chest.
This posture is also believed to help digestion by gently stretching and moving the lower abdomen. This can help with peristalsis – the movement of digested food through the intestinal tract. In addition, some studies claim that it reduces stress, sadness and fear, by freeing up the hips. Regular practice of the posture can help relieve stress or internal concern. However, keep in mind that scientific research is lacking to back this up.
Are there risks when doing the pigeon pose?
Although the pigeon pose is safe in most cases, it is true that it can increase the risk of injury if you perform the stretch too aggressively (going beyond your body's capabilities). If you have chronic hip, knee, or lower back problems, it is best to avoid this yoga pose unless recommended by a health professional. People who are pregnant or have mild to moderate musculoskeletal injuries should first talk to their doctor.
In addition, there is growing concern that the position could overstretching the tendons gluteals, which are tendons that attach to the outer hip bones. Over time, this can weaken the tendons and present as other hip-related problems.
Even many people are not able to bring the shin parallel to the front of their yoga mat and try to bring it too close to the body. Over time, this can cause a knee injury due to excess pressure on the knees. To avoid these risks, it is best to place a folded towel under the buttock and thigh to improve the position of the hips and knees. Doing so will reduce pressure and risk of injury.